Wednesday, November 30, 2011

5 Minutes or Less: WLS SAML2 SSO and your cookies

This is somewhat related to what Brian describes in WLS Session Cookie Overriding in an OAM/SSO Enabled Environment. Here, I want to quickly point one potential issue if you plan to implement Web SSO using Weblogic server as a SAML2.0 Service Provider (SP).

When configuring a Weblogic server instance for SAML2.0 services, you have to fill in a property called “Published Site URL”.

ServiceProviderGeneralInfo


When this instance is an SP, this property tell the partner IdP (Identity Provider) where to post SAML Responses to. In the case of SAML2.0, that URL must be http://<server>:<port>/saml2, where <server> and <port> must refer to how the IdP recognizes the SP. In other words, if you have something like a load balancer in front of Weblogic server (which is the case if you’re running a cluster), <server> and <port> would be the load balancer’s. “saml2” is the web context of Weblogic’s internal SAML2.0 servlet, whose fully qualified name is com.bea.security.saml2.servlet.SAML2Servlet.

Very well, this servlet, when called as a Service Provider, has the ability to consume a SAML assertion created by the partner IdP and instantiate an HTTP session for the browser session in the server. And it will tie it to the browser session by issuing a cookie named JSESSIONID whose cookie-path is set to “/”.  So what?

It turns out that many applications specify their own cookie-path to avoid the problem of JSESSIONID clashing, where last accessed applications by the browser override the JSESSIONID cookie value during the same browser session, thus leaving orphaned HTTP sessions in the server.

It also turns out that other applications use a different cookie name to avoid the same problem.

In both cases, the JSESSIONID cookie issued by saml2 servlet won’t be accepted by the application. You may be prompted for authentication again (this time by the application), get an HTTP 401-Unauthorized error or get into an infinite loop of redirects between SP and IdP.

The most obvious solutions to these problems is removing the cookie-path constraint from the application (in which case it defaults to "/") and having the application using the JSESSIONID name. You may need to get the blessings of your application provider for supportability purposes before proceeding to the changes.

That said, get to know your applications' cookies (cookie-name and cookie-path) before integrating them into WLS SAML2 SSO.

Monday, November 28, 2011

Webcast tomorrow: Oracle Identity Analytics for Healthcare Orgs

As some of you know my wife is a physician with a healthy interest in technology.  So, it is somewhat exciting to us that the collision of our work world's will be discussed tomorrow as Oracle hosts a webcast discussing Identity Analytics for Healthcare organizations.

Live Healthcare IT News Webcast: Managing Risk and Enforcing Compliance in Healthcare with Identity Analytics
 
Featuring experts from Kaiser Permanente, PricewaterhouseCoopers and Oracle


Tuesday, November 29, 2011 
10:00 a.m. PT / 1:00 p.m. ET

To find out more about this event or to register click here

Monday, November 21, 2011

More on Oracle Secure Token Services (OSTS)

Last week Andre made an excellent post introducing the Oracle Secure Token Services (OSTS) product.

I wanted to follow this up by letting everyone know about a good case study on the OSTS written by Oracle's partner the PathMaker Group.  The study is based on a deployement of the OSTS that they did with a customer a couple months ago.

http://www.oracle.com/us/products/middleware/identity-management/sts-wireless-telco-provider-525434.pdf

Thursday, November 17, 2011

OIM 11g OID (LDAP) Groups Request-Based Provisioning with custom approval – Part II

Introduction

This is Part Two of the article describing a potential implementation of Request Based LDAP Group Membership provisioning. Part One can be accessed here.

Continuing with the implementation after disabling the default approval policies at the Request and Operation Levels, the next step is to configure OIM to enable the modification of a provisioned resource via a request. The datasets associated to the Create and Modify operations of the resource in questions (OID User in this case) have to be imported into MDS. The connector’s installer at the present time doesn’t do the import of the metadata files to enable request based operations for the connector; this has to be done after installation by running the corresponding MDS utilities available in OIM.

Importing Connector’s Data Sets into MDS

The files containing the definition of the data collected by the Provisioning operations are called data sets. For OID User, there are two DataSet XML files:

  • ModifyResourceOID User.xml
  • ProvisionResourceOID User.xml

The one that we will need is the ModifyResourceOID User.xml. Here is the data set below:

From this data set this is what we will need for our implementation:

‘OID User Groups’ will be used as the attribute name to construct the RequestBeneficiaryEntityAttribute as shown in the code snippet below:

If you see any required attributes in the data set, you will have to create a value for the RequestBeneficiaryEntityAttribute for that attribute reference in the data set. The OID Server is one of those attributes. Also for the insertion of Child table records here is the specific code fragment for that:

Notice that we have to use the actual Database Table field name which can be retrieved from the Form Definition. See below:

Uploading DataSets into MDS

In this section I describe the process to upload DataSet XML files into MDS for OIM to use in Request Based Provisioning. As most of you know Data Sets determine the Fields collected during the provisioning process and certain attributes of those fields that make them required, pre-populated or only visible to the approvers. We won’t get into the details of the structure of the data sets involved here but at least we will cover a simple procedure for importing them into MDS. MDS is the acronym for Meta Data Store. Many applications part of the Fusion Middleware family rely on MDS to store configuration or Application Metadata.

This implementation works with OID’s data sets so this is the procedure to import them into MDS:

  • Create a directory inside // called DataSet/file (i.e in my case the directory is /opt/fmw11g/Oracle_IDM1/DataSet/file where my Middleware Home is /opt/fmw11g and my OIM installation resides under Oracle_IDM1 directory).
  • Copy all the datasets from the connector’s binaries home into the directory you just created in the previous step.
  • Switch to the bin directory inside the server directory under you OIM home directory (i.e. in my case /opt/fmw11g/Oracle_IDM1/server/bin).
  • Modify the file weblogic.properties inside the directory mentioned above. Here is mine:

Wls_servername is the name of the managed server as you defined it in the WebLogic Domain.
Application_name is always ‘oim’.

Metadata_from_loc is the path to the directory created in the first step. Specify this path omitting the last directory in the path (‘file’) as shown in the figure. So if you have a directory /opt/fmw11g/Oracle_IDM1/DataSet/file then the path should be specified as /opt/fmw11g/Oracle_IDM1/DataSet.
  • Set the OIM_ORACLE_HOME to your OIM installation Home (i.e. in my case this is what I did export OIM_ORACLE_HOME=/opt/fmw11g/Oracle_IDM1).Run the weblogicImportMetadata.bat|sh script. The script will ask the following:
  • User name: weblogic (Do not use xelsysadm)
  • Password:
  • Server URL: t3://myOIMHost:14000 # Provide the URL to your oim managed server and oim's port.
  • You should get an output similar to the one described below:


    Run the script PurgeCache.bat|sh. Before running the script you need to set WL_HOME and JAVA_HOME environment variables with your location of WebLogic Server installation directory and path to a valid Java JDK/JRE directory (i.e. WL_HOME=/opt/fmw11g/wlserver_10.3 and JAVA_HOME=/opt/fmw11g/jdk160_24 coming with my FMW installation). The output should be similar to the following:

In this case the user has to be xelsysadm instead of weblogic.

Configuring the Human Task (Custom Approval Process SOA Composite)

Now it is time to look in detail at the SOA Composite that will serve as an approval process for our entitlements (LDAP Groups). Look at the following set of pictures:

From the Composite.xml design view in JDeveloper, right click on the Green Human Task icon and select Edit.

Select the Participant block and the click the Edit button at the top of the screen. This brings the screen shown below:

Notice the Value Column of the participant selection table. It is a User whose Login ID is retrieved from the payload in this case: /task:task/task:ownerUser. This is populated in the early stages of the composite right after the corresponding approver is retrieved from the Entitlements_Staging Database table for the requested Entitlement identified by the field EntitlementID. This information is retrieved by the Database Adapter Web Service configured to execute a query against the Entitlements_Staging table part of the schema defined in our solution. For information on how to configure the Database Adapter task in a BPEL process, see the documentation for Fusion Middleware – SOA Suite.

Summary

In summary this post describes a potential approach to implement Request Based OID User Group Membership provisioning using a custom approval process.

The concepts shown in this post include:

  • A description of OIM API’s to construct and submit requests to modify provisioned resource.
  • A demonstration of the process of configuring Custom Approval Processes via Request Templates.
  • A description of the OIM configuration required to disable the default Request and Operation level approvals.
  • The steps necessary to customize the SOA composite to extract required Entitlement and Associated Approver information and how to set up the Participants of the Human Task used to Approve/Reject requests.
  • The steps to import metadata required to enable request based provisioning for OID Resource Objects (Users and Groups).

For further details about configuration of OIM for Provisioning Processes, Process Forms, Access Policies and any details mentioned but not covered in detail in this post please access OIM Fusion Middleware Documentation from the Fusion Middleware 11g documentation.

Wednesday, November 16, 2011

OIM 11g OID (LDAP) Groups Request-Based Provisioning with custom approval – Part I

Introduction

In recent days, I was assigned the task to implement a use case that I am sure many customers of Oracle have in mind but are not sure how to implement in OIM 11g. I even saw some thread inquiring about this very topic with no answer. Well, after some time I was able to put together an implementation of a Custom Approval process and a Custom UI based on ADF to request entitlements for users which in turn will be converted to Group memberships in OID (this also applies to any standard LDAP connector supported by OIM since the architecture is very similar for all of them). This article will be divided in 2 parts.

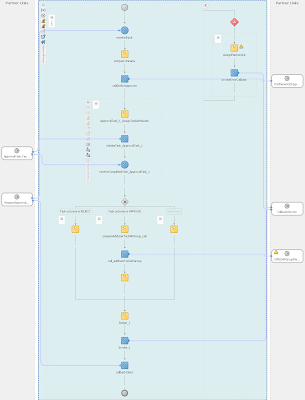
To give the audience a little overview this diagram shows the architecture of the solution:

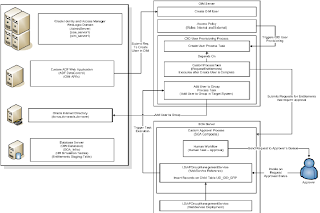
As shown in the figure above, the use case is implemented by taking advantage of a very powerful feature of OIM 11g, which is the integration with SOA to execute custom composites as approval processes. Inside the custom composite an invocation to a Web Service that implements the logic to insert records on the Child Table associated with the provisioning process instance of OID User Resource Object that in turn is associated with the Beneficiary of the original request. When an administrator provisions entitlements to a given person the following sequence of steps takes place:

  1. The WebService Data Control in the custom UI (ADF Web Application) inserts all the entitlements previously selected for this person into a Staging Table in Oracle Database.
  2. Then an API call to UserManager service is issued to create the OIM user in OIM.
  3. An Access Policy is evaluated against the recently created OIM user and an OID account is provisioned to the user.
  4. Once the OID user is created a process task which is dependent on the completion of the Create User Process Task gets executed. This process task reads the records in the staging table and does one of two things:
    1. If the entitlement doesn’t require approval, the process task directly inserts the Child Record in the UD_OID_GRP child table, which in turn causes the connector to add the group in the target system (OID in this case).
    2. If the entitlement requires approval, the process task creates a request to modify a provisioned resource using a pre-configured request template that has Template Level approval only (Request and Operation level approvals are configured with Auto-Approval flag on). The associated approval process is our custom composite, which will be described in detail later.
  5. For entitlements that require approval, the BPEL process part of the custom approval process retrieves the Login ID of the Approver for the requested entitlement. Then it copies the value of the approver’s login id into the task’s owner (part of the input payload).
  6. The Human Task picks the approver from the task owner and routes the request to the approver’s queue.
  7. The approver logs in to OIM and approves/rejects the request.
  8. Inside the composite, the Approved block executes upon request approval and calls a Web Service that exposes a method to insert the corresponding child table record into the Child Table. This in turn triggers the adapter to add the user to the group in the target system (OID).

There are several important things to keep in mind here:

Even though the request type is MODIFYRESOURCE and the values for the child table attributes are submitted in the form, the child records are not inserted automatically after the request is approved. This has caused a lot of confusion for customers who have posted questions about how to accomplish this and no one had answered before. This is why one needs to implement the child record insertion logic and make it execute in the Approved block inside the BPEL process of the Custom Approval Process SOA composite. Later I will present such logic to you for reference.

Remember that Request Based Provisioning is not configured nor enabled out of the box in OIM 11g after connector installation. You need to import the Data Sets into MDS (This applies to any of the LDAP type connectors of OIM in 11g’s world). I will provide the steps to accomplish this later in this post.

Make sure Auto Pre-populate and Auto Save form are enabled for all provisioning processes that are automatic (OID User and OID Group).

How to do it

Now, let’s start with the procedure to make this happen. In order to implement this functionality we are going to need the following components in our solution:

  • Java Process Task – The purpose of this task is to read the Staging table and for each entitlement assigned to the beneficiary user’s login ID, either a request will be submitted for approval or a direct entitlement provisioning is performed immediately.
  • Approval Process Custom SOA Composite – This SOA composite includes the following elements:
    • DB Adapter Web Service that retrieves the Approver Login ID for the requested Entitlement ID/Login ID combination.
    • JAX-WS Web Service that inserts the Entitlement as a group in the Child Table of OID User Resource.
  • Custom UI based on ADF and ADF Data Controls – This user interface provides access to the following functionality:
    • Create Internal/External Entitlements
    • Assign Approvers/Sponsors to Internal/External Entitlements respectively
    • Create Simulation HR Accounts that will be converted into OIM users.
    • Run the workflow to create OIM users and initiate the process of provisioning the LDAP OID Account and subsequently provisioning the corresponding entitlements as LDAP Groups.
  • Request Template for Entitlements – This component links the custom approval process with the request for entitlements. The configuration of this request template is described in detail later.
  • Approval Policy at Request Level – This Approval Policy is used to disable the out of the box Request Level approval that will send the request to the XELSYSADM user’s queue. This policy is configured as auto approved.
  • Approval Policy at Operation Level – This Approval Policy is used to disable the out of the box Operation Level approval that will send the request to the XELSYSADM user’s queue. This policy is also configured for auto approval.

Java Process Task

This component is the one that does the heavy lifting when it comes to creating and submitting Modify Provisioned Resource Requests to OIM.

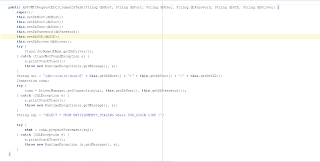
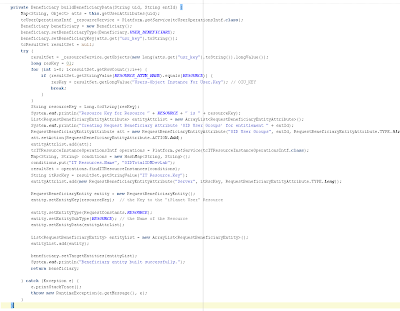
The figure below is the constructor of the Process Task. The parameters to the constructor allow the class to connect to the database hosting the Staging Table with the entitlements per user:

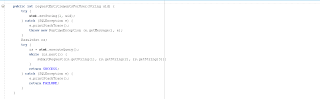
The figure shown next shows the method that obtains the entitlements for a given user and traverses the result set to submit requests for entitlements requiring approval or insert the records in OID User RO’s child table which will trigger the addition of the user into the corresponding group on the target system.

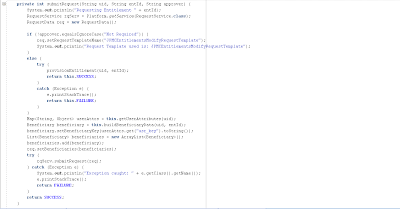
Here is the method that processes the entitlements returned by the query:

Notice the method buildBeneficiaryData presented below. This is a very important method since it actually builds the main structure of the request before submitting it.

This is the method that does direct provisioning of LDAP Groups:

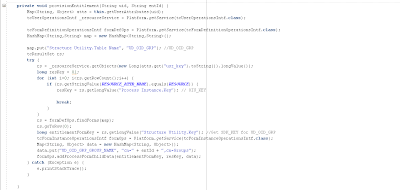
The RESOURCE constant has the value of “OID User”. The RESOURCE_ATTR_NAME constant has the value of “Objects.Name”. This is to work with OID User Resource Object, if you need to work with a different LDAP Server, replace the value of this constant with the name of your LDAP Server Associated Resource Object.

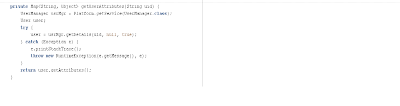
For retrieving user attributes, we provide the following method:

Configure this task to be a dependant of the Create User Task of the OID User Provisioning process. That will ensure that the task only executes when the OID User has been successfully provisioned. For details on how to accomplish this, please refer to the OIM documentation part of the Fusion Middleware 11g documentation set.

Custom Approval Process (BPEL)

The requirement for this scenario is that some entitlements require approval from an Approver or a Sponsor depending on the type of entitlement being requested. Internal users request only Internal type entitlements and External users can only select External entitlements. This is enforced by the User Interface by displaying a list of selectable entitlements according to the type of user to be created in OIM. The most important elements to notice are:

The invocation task labeled as callGetEntApprover. This Task gets the Login ID of the BeneficiaryDetails and the Entitlement ID taken from the ObjectDetails parts of the inputVariable’s payload, which contains all the request data.

The invocation task labeled as call_addUserToLDAPGroup included in the block that is executed when the task gets approved. The Web Service takes two parameters: the login ID of the beneficiary and the entitlement ID of the requested entitlement. Both pieces of data come from the request data available in the inputVariable’s payload.

Disabling Request and Operation Level approvals

Out of the box, OIM has Request and Operation level approvals configured for standard requests. Both of these send an approval request to XELSYSADM and OIMINTERNAL user which are both part of the SYSTEM ADMINISTRATORS group. If this is not the desired effect, here is how to disable these approvals:

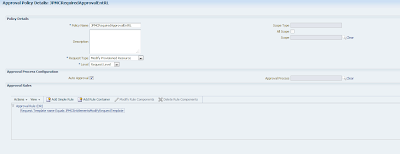
Create an Approval Policy for Request Level, the configuration from my implementation is presented below:

Now for the Operation Level approval here is the Approval Policy shown in the figure below:

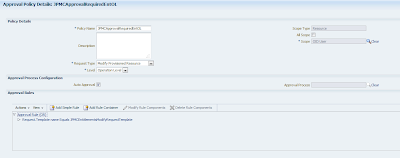
Notice the value in the Scope of the policy: OID User. This is required for operation level Approval Policies. You have to select the Resource Object for which the Approval Process is defined. In my case it is the OID User but in other cases it could be iPlanet User, AD User, etc. The easiest way to do it is by Composite Name which is what I did for these two Approval Policies.