Thursday, December 10, 2009

Oracle Access Manager (OAM) and Oracle WebCenter Suite

I’ve seen a lot of customer activity recently around integrating Oracle Access Manager (OAM) and WebCenter. By integration, I mean protecting WebCenter with OAM so that specific WebCenter access can be governed by OAM policies and single sign-on between WebCenter and other OAM protected web applications is enabled.

Derick Leo recently created a very good tutorial on this integration (specifically OAM and WebCenter Spaces) for Oracle employees. In this post I’d like to walk you through a condensed version of what Derick laid out and add some commentary.

The first thing to realize is that this integration is 95% the same as integrating with any JAVA web application running in Web Logic Server (WLS). You need to install and configure an OAM WebGate on the web server fronting the app server, you need to install and configure the OAM identity asserter on Web Logic, you need to configure policies in OAM to protected the various parts of the application, and you need to configure an appropriate authentication provider in WLS to populate the (JAAS) principals.

The only WebCenter specific parts of the integration are: 1) Setting a flag in the WebCenter startup script that tells WebCenter that it is being fronted by OAM and 2) Understanding the use of JPS (Java Platform Security – A component of OPSS) by WebCenter and the relation between JPS and the Web Logic SSPI.

Prerequisites
We begin by assuming you have installed and working instances of an LDAP directory (OID), OAM, Web Logic Server, and WebCenter Spaces itself.

We will also assume that you have Web Logic integrated with an HTTP web server of your choosing with an OAM WebGate installed on that web server. Here we will specifically assume you are using OHS with the OAM WebGate for OHS and the WLS plug-in for OHS.

OAM Policy Configuration
For purposes of illustration, I will be assuming that you are installing WebCenter Spaces to run under host www.acme .com.

1) Create a policy domain www.acme.com

2) Create a www.acme.com host identifier

3) In the www.acme.com policy domain, create the following protected resources
/owc_wiki/user/login.jz
/owc_wiki/adfauthentication
/integration/worklistapp
/workflow/sdpmessagingsca-ui-worklist/faces/adf.task-flow
/workflow/webcenterworklistdetail/faces/adf.task-flow
/workflow/sdpmessagingsca-ui-worklist
/rss/rssservlet
/owc_discussions/login%21withredirect.jspa
/owc_discussions/login%21default.jspa
/owc_discussions/login.jspa
/owc_discussions/admin
/webcenter/adfauthentication

4) Create the following resources that we will make unprotected, public resources
/webcenter
/owc_wiki
/owc_discussions
/rss
/workflow

5) Create a policy called “Public_URI_Policy” with the following specifics:
Resource Type: http
Resource Operation: Check GET and POST
Resource: Select all resources that you want to unprotect, listed above in step 4.

Under Authentication Rule tab, create a rule with the name Anonymous and authentication scheme OraDefaultAnonAuthNScheme

6) Back under the main www.acme.com policy domain configuration, under the Default Rules tab and the Authentication Rule subtab, create a rule with the name Default_SSO and authentication scheme OraDefaultFormAuthNScheme.

Configure the OID Authentication Provider for Web Logic

Create a new authentication provider called “OIDAuthProvider” of type OracleInternetDirectoryAuthenticator. Set the control flag to “SUFFICIENT” (more on this later).

Fill out the rest of the LDAP specific data under the “provider specific” tab. This is pretty straight forward and no different than a non-OAM WLS configuration that uses an LDAP authentication provider.

Configure the OAM Identity Assserter for Web Logic

Create a new authentication provider called “OAM Asserter” of type OAMIdentityAsserter. Set the control flag to “REQUIRED”.

Ensure that the obssocookie in the “Chosen” column under “Active Types”, then click save.
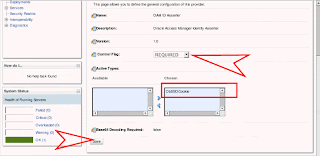


Next you must click on the provider specific tag of the OAM Asserter and fill out all the required OAM WebGate connection information. This is required because the OAM Id Asserter uses the OAM WebGate API to call the access server to validate the OBSSO token. The values for these should be consistent with the values for the WebGate protecting OHS. Example values are:

Transport: open
Application Domain: www.acme.com
Access Gate Password:
Access Gate Name: www.acme.com_AG
Primary Access Server: a.acme.com:6021
SSO Header Name: OAM_REMOTE_USER

Reorder WLS Providers

The order of the authentication providers in WLS is doubly important here.

First, authentication provider order is something that trips people up very often. It is important to understand the impact of ordering and the relationship between the order and the control flag assigned to each provider (REQUIRED, SUFFICIENT, or OPTIONAL). The WLS doc goes into this subject pretty well so I’ll just refer you to it: http://download.oracle.com/docs/cd/E12839_01/web.1111/e13707/atn.htm#SECMG172

The second less obvious impact of the authentication provider order is that it has an impact on WebCenter operations. At times WebCenter needs to query the user store and it does this through the Oracle JPS API and it appears that by default JPS picks up the user store information from the first authenticator in the list in the WebCenter domain. Now, this nuance can be explicitly overridden in the JPS configuration (jps-config.xml). However, it is definitely something to keep in mind.

So with that in mind, reorder the providers so that the OAM ID Asserter is first, followed by the OID Authenticator, and then by the default asserters and authenticators.

Configure WebCenter Spaces for OAM

Lastly, we must make a small tweak to tell WebCenter that it is behind OAM. The most obvious effect of this change is that a different landing/login page is displayed.

To perform the tweak:

1) Shutdown Web Logic
2) Open up the setDomainEnv.sh script located in your WebCenter domain
(/user_projects/domains/workshop_domain/bin/setDomainEnv.sh)
3) Add EXTRA_JAVA_PROPERTIES="-Doracle.webcenter.spaces.osso=true ${EXTRA_JAVA_PROPERTIES}"
export EXTRA_JAVA_PROPERTIES in an appropriate place in the file in amongst the other similar lines.
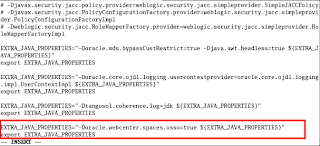
4) Restart Web Logic

Testing
When you go to the WebCenter Spaces landing/login page you should now see a login button in the upper right portion of the page rather than the login page itself that you see by default.
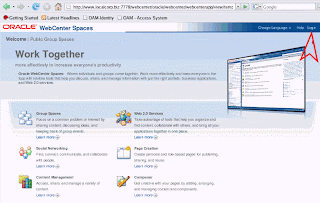


The login button will take you to the OAM login form and after providing valid credentials for a Spaces user, you should be able to use the application as before. You should also now be able to sing sign-on between WebCenter and other OAM protected applications, even apps running in containers other than WLS.

Wednesday, December 2, 2009

Understanding SAML Sender Vouches and WebLogic Server's Use of Certificates

There are two types of certificates involved in SAML Sender Vouches. The identity of the sender and the issuer of the SAML Assertion.

The identity of the sender and their certificate, is configured via the PKICredMapper on the client, and needs to be trusted by the server. This is based on the Trust Store configured for the domain.

The server also needs to sign the response. How the certificate is included in the response is determined by the policy of the web-service producer, and impacts set-up on the client. If you modify the RecipientToken element inside of the policy from this:


<ns1:RecipientToken>
<wsp:Policy>
<ns1:X509Token ns1:IncludeToken="http://docs.oasis-open.org/ws-sx/ws-securitypolicy/200702/IncludeToken/Never">
<wsp:Policy>
<ns1:WssX509V3Token10 />
</wsp:Policy>
</ns1:X509Token>
</wsp:Policy>
</ns1:RecipientToken>


to this:


<ns1:RecipientToken>
<wsp:Policy>
<ns1:X509Token ns1:IncludeToken="http://docs.oasis-open.org/ws-sx/ws-securitypolicy/200702/IncludeToken/AlwaysToInitiator">
<wsp:Policy>
<ns1:WssX509V3Token10 />
</wsp:Policy>
</ns1:X509Token>
</wsp:Policy>
</ns1:RecipientToken>


then the web-service will sign the response, and include the raw X.509 certificate. This certificate just needs to be from a trusted CA on the client. Without this modification, then WLS does not send the certificate and references the certificate by issuer's serial number. In this case, you need to set-up the CertificateRegistry and add the actual server's certificate into the client's certificate registry in order to be able to verify the response.

The second type of certificate is for the SAML Assertion, and the signing of the SAML Assertions is not required. Since the WLS CredMapper is actually creating the SAML Assertion and sender-vouches already requires the sender to be trusted, its not clear that signing the certificate adds any actual extra protection.

Writing managable policies in OES

I've been meaning to write this down for quite a while and never had the time to do the subject justice. I'm not sure that I have the time now, or that I've done the subject justice, but this is my attempt to describe the most common mistakes made by new users of OES.

Creating policies in OES is easy. Creating a manageable set of policies is easy too, but it usually requires a bit of forethought.

When you write a Authorization policy in OES you pick from a menu of options to fill in 5 boxes:

  1. Effect - one of Grant/Deny/Delegate
  2. Privilege AKA Action
  3. Resource
  4. Subject - user(s), group(s) or Role(s) or some combination thereof
  5. Constraint


The first thing new users of OES do is create a few users in OES' database and then start writing policies directly on those users. Something like
  • grant Alice access to Report123
  • grant Alice access to Report124
  • grant Alice access to Report125
  • grant Alice access to Report126
  • grant Alice access to Report127
  • grant Bob access to Report123
  • grant Bob access to Report124
  • grant Charlie access to Report123

OES supports this sort of deployment and there's nothing actually wrong with using OES with this model.

Well nothing except that it's unmanageable.

Why?

Why shouldn't Charlie have access to Report124? When Charlie gets that big promotion which additional reports does he need permission to access? When we hire Dave which reports does he need to access?

It's much better to write your policies on Roles:
  1. grant SupportReps access to Report123
  2. grant TealLeads access to everything that SupportReps have
  3. grant TeamLeads access to Report124
  4. grant SupportManagers access to everything that TeamLeads have
  5. grant SupportManagers access to Report125, Report126 and Report127

If you do things The Right Way these roles are hierarchical - the SupportRep role is below TeamLead which is in turn below SupportManager. This means that rule #2 and #4 go away.

Then you create policies to grant the SupportRep role access to the resources that a support rep needs, etc.

And that's the standard pitch for Role Based Access Control (RBAC)


Once you get your head around RBAC the next logical question is "Is there a standard way to automatically load/maintain users in OES?" (an actual question posted to OTN forums).

The answer is you probably don't need to do that.

Really.

The only things you need to put in OES' user database are those that you want to directly use in an OES policy.

If you have all of your users in an LDAP directory or an existing database then why would you want to replicate all of that into another database? Even with provisioning it's an unnecessary complication since an OES Security Module can be configured to use your existing directory or database simply by configuring the appropriate Authenticator. When a user actually logs in the Authentication Provider will go to your user directory, authenticate the user and gather up all of their group memberships. That information gets stored in the JAAS subject as a list of Principals, and at authorization time the JAAS subject is where OES gets the information it needs about the user.

So in our example if you wanted to create a policy to grant the SupportManager Role to everyone in a group named "SupportManagerGroup" in your LDAP directory then you would need to create a group with the same name in OES' database. You do not need to create the users in the OES GUI or through OES' management APIs. And you certainly don't need to maintain group memberships in OES' policy database.

Actually granting that Role to the existing group of users is trivial - go to the Roles tab in OES click New to create a new Role policy and pick the group off the list.

Doing all of that gets us down to
  • grant Alice the SupportManagers Role
  • grant Bob the TeamLead Role
  • grant Charlie the SupportRep Role
  • grant SupportReps access to Report123

  • grant TeamLeads access to Report124
  • grant SupportMangers access to Report125, Report126, Report127
  • But we're not done yet because there's one further simplification possible.

    So far we've been talking about Report123, Report124, Report125, Report126, and Report127 as named objects in OES. OES allows you to do that and again there's often absolutely nothing wrong with creating all of those objects in OES directly. If you have a small number of objects or don't add and remove objects often this is perfectly reasonable and easily manageable. But if you have hundreds or thousands of objects or you add and remove objects frequently this can quickly become troublesome.

    Objects in the actual application, like Reports, almost always have some metadata. In this example they might contain a Region and Department number. Further let's assume that a user has a single department, and is associated with one or more regions.

    A simpler way to express the authorization policy might then simply be to say:
    • A user may see reports associated with their department and one of their regions
    When you write the policy in OES you pick off the menus
  • Effect: Grant
  • Action: view
  • Resource: //Reports
  • Subject: Role/SupportRep


  • and then you enter a constraint that compares the department on the report with the user's department and compares the region on the report with the list of regions associated with the user.

    In OES this represented with the syntax:
    grant( view, //Reports, //Roles/SupportRep ) if reportDepartment = userDepartment and reportRegion in [userRegions]


    So all told we went from eight hard to understand policies to four policies - three to grant roles and one for authorization. And when we hire, fire, promote, demote or do anything else with users we don't have to touch OES.