Thursday, February 25, 2010

OID password policies and account lockouts

The other day I blogged about database 11g's default password policies and how to disable them for your test environment. Today my passwords for OID expired and I thought I'd pass along the same information for OID in case anyone anyone needs that information too.

The first thing you should know is that there is no oidadmin in OID 11g. I'm going to ignore the GUI tools here and just document how to disable the policies via ldapmodify.

First find your default password policy by searching for any objects with the objectclass of pwdpolicy. In the default configuration there should be only one
[oracle@demo5 ~]$ ldapsearch -b dc=oracledemo,dc=com -p 3060 -D cn=orcladmin -w abcd1234 objectclass=pwdpolicy dn
cn=default,cn=pwdPolicies,cn=Common,cn=Products,cn=OracleContext,dc=oracledemo,dc=com
[oracle@demo5 ~]$
Assuming you want to disable the policy all you need to do is change the value of pwdlockout to 0 (that's Zero, not Oh) and the policy will be disabled. So something like this:
[oracle@demo5 ~]$ ldapmodify -p 3060 -D cn=orcladmin -w abcd1234
dn: cn=default,cn=pwdPolicies,cn=Common,cn=Products,cn=OracleContext,dc=oracledemo,dc=com
changetype:modify
replace: pwdlockout
pwdlockout: 0

modifying entry cn=default,cn=pwdPolicies,cn=Common,cn=Products,cn=OracleContext,dc=oracledemo,dc=com

[oracle@demo5 ~]$
And finally if you have any accounts that are locked out and you need them re-enabled without changing their password you need to modify the account and add the attribute orclpwdaccountunlock with the value 1 (that's one, not El). So something like this:
[oracle@demo5 ~]$ ldapmodify -p 3060 -D cn=orcladmin -w abcd1234
dn: uid=hbowman,cn=Users, dc=oracledemo, dc=com
changetype: modify
add: orclpwdaccountunlock
orclpwdaccountunlock: 1

modifying entry uid=hbowman,cn=Users, dc=oracledemo, dc=com

[oracle@demo5 ~]$

Tuesday, February 23, 2010

Oracle database 11g default password policies

I recently booted a VM that I hadn't used in some time and found this error appeared when I fired up sqlplus
ERROR:
ORA-28002: the password will expire within 7 days
From what I've been able to gather Oracle database 11g sets up a password expiration policy by default. This isn't usually a problem for me since I usually create a VM, work on it for a week or six before moving on to another project. But this VM is special - it's my combined IAM stack demo VM from OpenWorld and I need it every once in a while.

If you find yourself in this position here's how you disable the password policies and get things working again.
First turn off the password policies:
ALTER PROFILE DEFAULT LIMIT
FAILED_LOGIN_ATTEMPTS UNLIMITED
PASSWORD_LIFE_TIME UNLIMITED
PASSWORD_GRACE_TIME UNLIMITED;
Then check the status of your accounts:
set line 120
select username, account_status, expiry_date, lock_date from dba_users;
Then reenable the ods user and any other users by resetting their password:
alter user ods identified by abcd1234;
Hope this helps!

Remember: Don't do this in production!

Monday, February 22, 2010

OpenAz PEP Layer Now Available

The PEP layer is now available for the OpenAz project. You can find some very basic information on it here. I spent a decent amount of time working with the XACML guys on this layer. What I wanted to try to do was built a set of APIs that simplified building PEPs on top of the AzAPI (Java wrapper around XACML). The AzAPI, like XACML is very very powerful, but in the work that I do with customers, most of the time, customers are looking for some basic functionality. Based on patterns we've seen at a number of customers, we tried to make some very common PEP scenarios easy to implement with the this layer. In this post, I'll show how the OpenAz PEP simplifies building a PEP.

The Hello World PEP


AzService azService = new org.openliberty.openaz.pdp.provider.SimpleConcreteService();
PepRequestFactory pep = new PepRequestFactory(CONTAINER,azService);
PepRequest req = pep.newPepRequest("josh","hello","world");
PepResponse resp = req.decide();
System.out.println(resp.allowed());

if (resp.allowed()) {

Map<String,Obligation> obligations = resp.getObligations();
Iterator obligationsIt = obligations.keySet().iterator();
while (obligationsIt.hasNext()) {
String obligationName = obligationsIt.next();
Map values = obligations.get(obligationName);
System.out.println(obligationName+"=>"+values);
}
}

The org.openliberty.openaz.pdp.provider.SimpleConcreteService is the example AzService (wrapper around XACML) that is there in the OpenAz project. Soon, we'll get an implementation of the AzService that uses the Sun XACML implementation.. Using the AzService we get a handle to the PEPRequestFactory. The PEPRequestFactory is used to generate one a PEPRequests. In the example, we're using the most basic for - simply passing in a String for the user, the action, and the resource. Once the request is generated, a response is returned and we can process the result. The response has a simple yes/no result, and then a handle to process the obligations. Obligations, as we've discussed on numerous occasions on this blog, can be used to have the PDP communicate additional responses to the PEP.

Features of the PEP Layer


The example above shows how simple doing very basic PEP calls, but there are a number of powerful features that are worth highlighting
  • Mapping of Native Java Objects - You can create a PEP request from any Java Object. This is done through the concept of "mappers". Each PEPequestFactory is configured with a set of Mappers. A mapper converts a Java object into a collection of attributes that XACML PDP can understand. This means that things like JAAS Subjects, Java Permissions, String, Sockets, custom objects, can be marshalled from their native form to XACML. Very useful is you want nice clean code.
  • Simplified Response Handling - As you saw in the example, the response is a simple yes/no and the Obligations are basically strings.
  • Handlers - You can add pre and post decision handlers to extend the functionality with caching (pre) or auditing (post).
  • Easy access to the full AzAPI - The main idea was to keep things simple at the PEP layer, but if implementations require the full AzAPI, you can start with the PEP layer, and the complete it by getting access to the AzRequestContext or AzResponseContext

    What should I do next?


    You can join the OpenAz mailing list, to follow and add to the discussion. Take a look at the project or sourceforge and contribute, or just give feedback on the API. A good place to start is with the tests. This shows some of the basic useage of the API.
  • Oracle Entitlements Server (OES) Advanced Rules Engine Like Capabilities

    Over the past week, I've had a couple of customers looking to use Oracle Entitlements Server (OES) to replace existing home grown authorization solutions that make heavy use of general purpose rules engines. As part of their investigation, I've gotten a few questions which basically boil down to "How to replicate the functionality that I have today in OES?". Before I get into the specific scenarios and how they can be achieved with OES, I want to make a some-what obvious point. OES is a rules-engine but its optimized to answer the "What Roles does this user have?" and "Can this user perform this action on this resource?" very quickly and efficiently. This means that getting OES to function exactly the same way as a generic rules engine functions can be done, but it will take custom code and probably complicate the policy model. The more fidelity required with the existing model the more complex the OES deployment. At some limit, it might just make sense to have OES call the rules engine via a custom eval function. This is an extreme case, and I mention it only to illustrate the point that when purchasing a product which replaces another product or custom solution, you'll get the best ROI by embracing the new products capabilities. Its in this context that I want to explore two specific scenarios.

    Named Rules


    The concept here is that a policy is just a combination of named rules. For example:

    Rule A: user has title="Manager"
    Rule B: user has department="12345"
    GRANT Role Manager_12345 if A and B

    There are a couple of different approaches for how to model this type of scenario in OES.

    Model Named Rules as Dynamic Attributes


    In this approach, the logic of the specific rules is "hard coded" into the attribute retriever. One nice thing about the AttributeRetrieverV2 interface is that you can get access to attributes via other AttributeRetrievers. Below is psuedocode for Rule A and Rule B

    package namedrules;

    import com.bea.security.providers.authorization.asi.*;
    import com.bea.security.providers.authorization.asi.ARME.evaluator.RequestHandle;

    import com.bea.security.providers.authorization.asi.ARME.exceptions.ArmeRuntimeException;
    import com.bea.security.providers.authorization.asi.ARME.exceptions.CredvarException;
    import com.bea.security.providers.authorization.asi.ARME.exceptions.NotReadyException;
    import com.bea.security.quark.exceptions.ParserException;

    import com.wles.BadParameterException;
    import com.wles.util.AttributeElement;

    import java.util.List;
    import java.util.Map;

    import javax.security.auth.Subject;

    import weblogic.security.service.ContextHandler;
    import weblogic.security.spi.Resource;

    public class NamedRuleAttributeRetriever implements AttributeRetrieverV2 {

    public String[] getHandledAttributeNames() {
    return new String [] {"RuleA","RuleB"};
    }

    public Object getAttributeValue(String name, RequestHandle requestHandle,
    Subject subject, Map map,
    Resource resource,
    ContextHandler contextHandler) {

    if (name.equals("RuleA")) {
    try {
    AttributeElement title = requestHandle.getAttribute("title",true);
    List titleValues = (List)title.getValueAs(List.class);
    return titleValues.contains("Manager");
    } catch (Exception e) {
    e.printStackTrace();
    return Boolean.FALSE;
    }
    } else if (name.equals("RuleB")) {
    try {
    AttributeElement dept = requestHandle.getAttribute("department",true);
    List deptValues = (List)dept.getValueAs(List.class);
    return deptValues.contains("12345");
    } catch (Exception e) {
    e.printStackTrace();
    return Boolean.FALSE;
    }

    }

    }
    }

    The biggest downside to this approach is that the rules themselves are hard coded inside of the logic of the attribute retriever. If this logic changes, you need to recode the retriever and re-deploy. It would better to have something a little more generic.

    Model Named Rules as Resources


    The idea is that the actual logic of the rule membership is still modeled in OES policy, instead of in the code. To do this create a separate node in the same SM called "namedrules". Model the rules like this:

    GRANT (//priv/RuleA, //app/policy/namedrules, //sgrp/users/allusers) if sys_defined(title) and title="manager"
    GRANT (//priv/RuleB, //app/policy/namedrules, //sgrp/users/allusers) if
    sys_defined(dept) and dept="12345"

    Now, the trick part. How do I get these policies evaluated? You'll need to make a call back into the AuthorizationService. This is pretty powerful, yet some what risky stuff. The issue is that you don't want to wind up with circular dependencies that will cause StackOverflow. The best way to avoid this is to not have named rules referencing named rules. If you need to be more fancy, then the example below could be extended to include a ThreadLocal variable with a counter to make sure that you're not putting more than say 5 requests on the stack. Below is the basics for this type of approach.

    package namedrules;

    import com.bea.security.AccessResult;
    import com.bea.security.AppContext;
    import com.bea.security.AppContextElement;
    import com.bea.security.AuthenticIdentity;
    import com.bea.security.AuthenticationService;
    import com.bea.security.AuthorizationService;
    import com.bea.security.ParameterException;
    import com.bea.security.PolicyDomain;
    import com.bea.security.RuntimeAction;
    import com.bea.security.RuntimeResource;
    import com.bea.security.SecurityRuntime;
    import com.bea.security.ServiceNotAvailableException;
    import com.bea.security.ServiceType;
    import com.bea.security.SimpleContextElement;
    import com.bea.security.providers.authorization.asi.ARME.evaluator.RequestHandle;
    import com.bea.security.providers.authorization.asi.AttributeRetrieverV2;

    import java.util.Map;

    import javax.security.auth.Subject;

    import weblogic.security.service.ContextElement;
    import weblogic.security.service.ContextHandler;
    import weblogic.security.spi.Resource;

    public class PolicyBasedAttributeRetriever implements AttributeRetrieverV2{

    private AuthorizationService atz;
    private AuthenticationService auth;
    private PolicyDomain pd;

    public PolicyBasedAttributeRetriever() {
    super();
    }

    public String[] getHandledAttributeNames() {
    return new String[]{};
    }

    public Object getAttributeValue(String ruleName, RequestHandle requestHandle,
    Subject subject, Map map,
    Resource resource,
    final ContextHandler contextHandler) {


    if (atz==null) {
    try {
    pd = SecurityRuntime.getInstance().getPolicyDomain(System.getProperty("wles.realm"));
    this.auth = (AuthenticationService)pd.getService(ServiceType.AUTHENTICATION);
    this.atz = (AuthorizationService)pd.getService(ServiceType.AUTHORIZATION);
    } catch (Exception e) {
    e.printStackTrace();
    return null;
    }
    }

    try {
    AuthenticIdentity ai = this.auth.assertIdentity("WLS.Subject",subject);

    RuntimeResource runtimeResource = new RuntimeResource("namedrules","exampleResource");
    RuntimeAction runtimeAction = new RuntimeAction(ruleName, "exampleAction");

    //This is just a simple wrapper around the ContextHandler
    AppContext contextHandlerWrapper = new AppContext() {

    public int size() {
    return contextHandler.size();
    }

    public String[] getNames() {
    return contextHandler.getNames();
    }

    public AppContextElement getElement(String name) {
    return new SimpleContextElement(name,contextHandler.getValue(name));
    }

    public AppContextElement[] getElements(String[] strings) {

    ContextElement [] ctxElements = contextHandler.getValues(strings);

    AppContextElement [] appCtxElements = new AppContextElement[ctxElements.length];

    for (int i=0; i<ctxElements.length; i++) {

    appCtxElements[i] = new SimpleContextElement(ctxElements[i].getName(),ctxElements[i].getValue());

    }

    return appCtxElements;
    }
    };

    AccessResult result =
    this.atz.isAccessAllowed(ai,runtimeResource,runtimeAction,contextHandlerWrapper);

    return Boolean.valueOf(result.isAllowed());

    } catch (Exception e) {

    return Boolean.FALSE;
    }

    }
    }

    A few key things in the example. You'll need to use a lazy initialization of the PolicyDomain. If you try to load it in the constructor of the AttributeRetriever, bad things happen. Also, using the built in WLS.Subject token type for the IdentityAsserter is an easy way to convert from a JAAS Subject to an AuthenticIdentity.

    Rule Debug Information


    Another scenario is that the caller needs to understand very detailed information about the rules evaluation. Some examples

    • Why did the user did not get access?
    • What role cause the user to get access?

    OES has a number of ways of addressing these types of queries

    Add report_as to your policies


    The simplest thing to do is to add report_as constraint to a given policy. Note: This only works for authorization policies. An example:

    DENY (//priv/read, //app/policy/someresource, //role/authors) if NOT owner = sys_user and report_as("error","You are not the owner of this document")

    This works for a few policies, but may not be practical if you have a very large number of policies.

    Use DebugInfo


    If you are using the Java SM, you can use the DebugInfo to get very detailed information about which roles and rules applied. The instructions for using this Debug API are here. One observation that might make things easier. Through the entitlementsadministration ui you can add notes to policies. Those notes are available through the API. You can even get down to specific attributes and their values.

    Custom Evaluation Function


    This approach works for SMs other than the Java SM or if you want to report back additional information about policy evaluation and attributes. Take the example where a user is granted access based upon attributes.

    GRANT (//priv/read, //app/policy/r1, //sgrp/users/allusers/) if assertAttribute("state","=","CA",true,"You don't live in California") AND assertAttribute("txn_amount","<",500,true,"Transaction is over 500")

    The idea with this example is that I want to be able to communicate why the user is not granted access. Below is the psuedocode for the assertAttribute function.

    package namedrules;

    import com.bea.security.providers.authorization.asi.ARME.evaluator.RequestHandle;

    import com.wles.util.AttributeElement;

    import java.util.List;

    public class AttributeEvalFunction {


    public boolean assertAttribute (RequestHandle requestHandle, java.lang.Object[] args, javax.security.auth.Subject subject, java.util.Map roles, weblogic.security.spi.Resource resource, weblogic.security.service.ContextHandler contextHandler) {

    try {
    String attributeName = (String)args[0];
    String operator = (String)args[1];

    Boolean assertionResult = (Boolean)args[3];

    AttributeElement element = requestHandle.getAttribute(attributeName,true);

    boolean result = false;

    if (element.getASIType().equals("string")) {

    String value = (String)args[2];

    if (operator.equals("=")) {
    List values = (List)element.getValueAs(List.class);
    result = values.contains(value);
    }


    }

    if (assertionResult.booleanValue() == result) {
    System.out.println("Assertion Passed: "+attributeName+" "+operator+" "+args[2]+" "+assertionResult.booleanValue());
    return true;
    } else {
    //Return the message
    System.out.println("Assertion Failed: "+attributeName+" "+operator+" "+args[2]+" "+assertionResult.booleanValue());
    requestHandle.appendReturnData(attributeName,args[4]);
    return false;
    }

    } catch (Exception e) {
    e.printStackTrace();
    return false;
    }

    }

    }

    Conclusion


    This post outlines a number of ways to use the OES engine to emulate some common capabilities of generic rules engines. Its obviously some bit of work to select the right approach to fit specific requirements. Hopefully what I've show is helpful in bootstrapping some thinking in this area. I look forward to your feedback and some of your own patterns in this area.

    Wednesday, February 10, 2010

    A simple remote API that modifies WebLogic Portal (WLP) Visitor Entitlements

    Recently, I was looking for a simple remote API to modify the visitor entitlement roles available inside of a portal. Specifically, I wanted to check if a role existed, and if it didn't create it. The entire use case is that the role policies are going to be defined in Oracle Entitlements Server (OES) but the policy (assigning or roles to WLP artifacts like desktops and portlets) is going to be handled inside of WLP. We'll leave the OES pieces for another time. The focus on this post is the WLP APIs that are available for manipulating the visitor entitlements.

    After reviewing what I knew about WLP Vistor entitlements and scanning the documentation, I presented two approaches to the WLP team - direct modification of the database or some use of the RolePolicyManager. I was pushed towards the API approach - after all - that's what its there for. I was initially leaning towards the database because I wanted to invoke this API simply, and you can do quite a bit with SQL Ant Task. So, off I went to try to figure out how to use the RolePolicyManager.

    First of all, I'm not a WLP expert, so if this is a well know issue, then read on, but I had trouble getting Workshop to generate a valid WLP EAR. I had this problem - some issue with the facets being out of whack. Thanks gsmith.

    Moving on, now that I had an EAR, the next step was to figure out how to use the RolePolicyManager to search for a role. The first thing that helped was turning on some WLP debugging. I set-up a debug file file this:

    # turn on package names for debugging
    usePackageNames: on


    # append output to mydebug.log file rather than System.err
    out.file = mydebug.log

    com.bea.p13n.entitlements.management: on

    This dumps out a lot of good information. So, with debug on, and clicking through the WLP Visitor Entitlements screens, I get some output like this:

    [com.bea.p13n.entitlements.management.internal.RDBMSRolePolicyManager.getRolePolicy():347] get role policy:
    id: type=, EntApp=MyPortalEAR, Webapp=MyWeb, Resource=com_bea_p13n_role_policy_pool, Capability=
    policy name: AnonymousVisitor

    This lead to my first ah-ha! I was able to return the list of Roles for the web app by making the following API call

    out.println(java.util.Arrays.asList(RolePolicyManager.listRolesForResource(ear,war,"com_bea_p13n_role_policy_pool")));

    com_bea_p13n_role_policy_pool is the resource. The javadoc then tells me that the String [] returned contains role policy names.

    At this point, I'm almost there with all of the parameters that I need to create a RolePolicyItem and see if it exists. The only missing piece is the resourceScope. All of the likely values are available on EntitlementsConstant. After some experimenting, the answer is EntitlementConstants.ENT_APP_ROLE_INHERITANCE. I'm now able to check and see if a role policy exists.

    com.bea.p13n.entitlements.policy.RolePolicyItem ri =
    new com.bea.p13n.entitlements.policy.RolePolicyItem();

    ri.setEntAppName(ear);
    ri.setResourceId("com_bea_p13n_role_policy_pool");
    ri.setWebAppName(war);
    ri.setPolicyName(role);
    ri.setResourceScope(com.bea.p13n.entitlements.common.EntitlementConstants.ENT_APP_ROLE_INHERITANCE);


    com.bea.p13n.entitlements.policy.RolePolicyItem ri2 =
    rpm.getRolePolicy(ri);

    if (ri2==null) {

    rpm.createRolePolicy(ri);
    out.println("Role "+role+" added.");

    } else {

    out.println("Role "+role+" already exists");

    }


    If the role doesn't exist it returns null. All that's left is to create the role, and that's a line call. The next time the administrator logs into the portal administration - the role is there :)

    One problem that I had to overcome. I'd been invoking this from inside an unprotected JSP. When I go to call the getRolePolicy method, I get an exception that I'm not authorized. To work around this, I move the jsp to a folder called admin and protect that folder with BASIC auth and restrict access to only the role Admin which includes the user weblogic. From web.xml:


    Admin Resources
    /admin/*


    Admin


    Admin


    BASIC


    and weblogic.xml


    Admin


    So now I have a JSP packaged in a separate EAR that can add a role to any webapp in any ear deployed on the cluster. Also, by placing the JSP in a different WAR and protecting it by BASIC, its pretty simple to go an invoke it remotely. I used cURL


    I hope that this post helps other people who need a simple remote API for manipulating the WLP Visitor Entitlements. The techniques discussed (as well as actually looking at the p13 schema) should give you enough information to extend this approach to other operations and scenarios.

    Monday, February 8, 2010

    Extending Universal Content Management (UCM) Security with Oracle Entitlements Server (OES) - Part 2

    This is a continuation of my post from last week describing an integration between OES and UCM. This post is the fun post where I get to talk about the functionality in the solution and some more of the technical details.

    Overview


    Basically, what I've built is a custom component inside of UCM that makes calls to the OES Java API. To be specific, the component actually talks to a wrapper which in turn uses Java refection to communicate to the actual Java API. This is a consequence of using the custom-classloader example. As I discussed previously, the benefit of doing this is that the OES component can have an isolated classloader which comes in very handy since UCM loads all of the classes that all of the custom components need into the system classloader. I think that this is not really a big deal, and most of the useful APIs have already been handled in the examples.
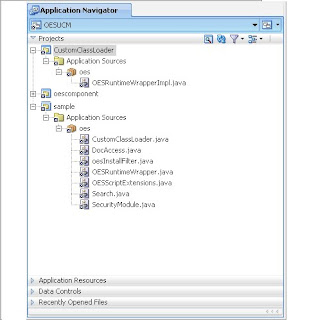
    The OESRuntimeWrapperImpl is the only class in the oesucmclassloader.jar. This jar along with all of the other jars in the BEA_HOME/ales32-ssm/java-ssm/lib directory are loaded by the custom classloader. How are this and the OES Java API then available to the oes-ucm component (sample project) which is loaded by the system classloader? Its all handed by the OESRuntimeWrapper

    customLoader = new CustomClassLoader(Thread.currentThread().getContextClassLoader(), u);


    Thread.currentThread().setContextClassLoader(customLoader);

    // load the entry class using custom classloader
    Class myClass = Class.forName("oes.OESRuntimeWrapperImpl", true, customLoader);
    Class[] paramType;
    // get references to all the needed methods

    paramType = new Class[] { Object.class,
    String.class,
    String.class,
    Properties.class,
    Map.class };

    isAccessAllowedMethod = myClass.getMethod("isAccessAllowed", paramType);

    paramType = new Class [] { String.class, Object.class};

    assertIdentityMethod = myClass.getMethod("assertIdentity",paramType);

    paramType = new Class[] { CallbackHandler.class };
    authenticateMethod = myClass.getMethod("authenticate", paramType);

    paramType = new Class[] { String.class,
    String.class,
    String.class,
    String.class };


    // call the constructor
    Constructor cons = myClass.getConstructor(paramType);
    Object[] args = { alesAppConfigName, alesAppConfigId, resourceAuthority, actionAuthority };
    OESRuntimeWrapperImplObj = cons.newInstance(args);

    When the OESRuntimeWrapper gets created, it instantiates java.lang.reflect.Method objects for each of the methods in the OESRuntimeWrapper, and then uses those same Method objects, but instead invokes them on the OESRuntimeWrapperImpl object. Below is the example of the OESRuntimeWrapper.isAccessAllowed

    public Boolean isAccessAllowed(Object authenticIdentity, String runtimeResource, String runtimeAction
    , Properties appContext, Map responseContext)
    {
    ClassLoader threadCLDR = Thread.currentThread().getContextClassLoader();

    Boolean result = null;

    try
    {

    Thread.currentThread().setContextClassLoader(customLoader);
    Object paramObj[] = { authenticIdentity, runtimeResource, runtimeAction, appContext, responseContext };

    result = (Boolean) isAccessAllowedMethod.invoke(OESRuntimeWrapperImplObj, paramObj);

    }
    catch (InvocationTargetException refEx)
    {
    Throwable srcEx = refEx.getCause();
    if (Error.class.isInstance(srcEx)) throw (Error) srcEx;
    if (RuntimeException.class.isInstance(srcEx)) throw (RuntimeException) srcEx;
    throw new RuntimeException("InvocationTargetException" + srcEx.getMessage(), refEx);

    }
    catch (Exception e)
    {
    // LOGGER.error("Error getDescription ", e);
    throw new RuntimeException(e.getMessage(), e);

    }
    finally
    {
    Thread.currentThread().setContextClassLoader(threadCLDR);
    }

    if (null != result) return result.booleanValue();
    return false;

    }

    The reason I'm going into all of this detail is so that if you need to modify any of the methods in the sample to expose different OES APIs (like for example, to do an authorization query), that you'll know how. Remember, if you make any changes to the OESRuntimeWrapperImpl, you need to rebuild the oesucmclassloader.jar and deploy it to the BEA_HOME/ales32-ssm/java-ssm/lib directory

    The oes component for UCM


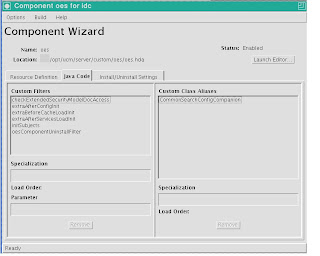
    Let's start by looking at the UCM Component Wizard's view of the oes component


    Initialization


    On the Java tab, we can see the Filters and Class Aliases that this component uses. The extraAfterConfigInit,extraBeforeCacheLoadInit,extraAfterServicesLoadInit, and initSubjects are all filters called at various phases of initialization of UCM. The oesInstallFilter is called during the extraAfterServicesLoadInit and instatiates the OESRuntimeWrapper

    String configID = SecurityModule.tryGetPolicyDomainName();
    runtime = OESRuntimeWrapper.getInstance("Java API Example Application", configID, "exampleResource", "exampleAction");

    Object obj = runtime.assertIdentity("USERID_TOKEN","weblogic");
    System.out.println(obj);

    This is as good as time as any to discuss the UsernameIdentityAsserter and how its used within the oes component. Basically, this IdentityAsserter will generate an authentic identity as long as you pass it a valid username. The ultimate validity of the name falls to the configured authentication providers in the configured SM instance. In order to avoid replicating all of the usernames in UCM into the OES RDBMS authentication provider I used a trick that enables any username to be valid. The trick is in the SQL query that the authentication provider used to validate the user. Change the Entry SQL Query to Verify User to
    Select ? from dual
    . As you'll see in other examples inside of the component, we're retrieving the username from the UserData class, so the right solution to identity assertion problem is to replace the example UsernameIdentityAsserter with an IdentityAsserter that take the UserData object, thus avoiding the Worlds Most Dangerous IdentityAsserter.

    checkExtendedSecurityModelDocAccess


    For people that don't have the HowToComponentsBundle handy, this is the definition for the checkExtendedSecurityModelDocAccess Filter


    During a security check for a document, executed to augment the normal security levels to grant access to other documents.
    Cached Objects: Integer desiredPrivilege, intradoc.data.ResultSet securityProfileResultSet, intradoc.data.DataBinder securityProfileData, Boolean securityResult, String securityResultMsg


    So, this is the Filter that gets called when a user attempts to access a single document/folder. I'm not UCM API expert, but you can check out the cleverly named DocAccess class to see how I'm able to pull the relevant pieces (user, action, resource) out of the Filter and call the OES API. In the example, I was only interested in documents, not folders, so I only make the isAccessAllowed call when I get passed an account or a security group (this seems to only occur on documents). I also based the URL of the URL of the document. You'll have to tweak the resource scheme to meet your needs. I think one important aspect of the solution is the passing of all of the meta-data on the document down to OES as attributes. There are 50+ attributes available by default and you can add custom attributes. This is the foundation for some very powerful label based or attribute based access control models.

    CommonSearchConfigCompanion


    By extending the intradoc.search.DBSearchConfigCompanion class, the oes.Search class can be used to add search filters based on response returned by OES policies. All of this "magic" happens in the prepareQueryText method.

    @Override
    public int prepareQueryText(DataBinder dataBinder,
    ExecutionContext executionContext) throws DataException {
    System.out.println("Before PrepareQueryText "+dataBinder.getLocalData());

    String queryText = (String)dataBinder.getActiveAllowMissing("QueryText");

    System.out.println("WC: QueryText="+queryText);

    //queryText = "xoesroles <contains> `stateFL`";
    String user = dataBinder.getLocal("dUser");

    if (user.equals("sysadmin")) {
    int rc = super.prepareQueryText(dataBinder, executionContext);
    System.out.println("After PrepareQueryText "+dataBinder.getLocalData());
    return rc;
    }

    String action = "search";

    String resource = oesInstallFilter.getResourcePrefix();

    Object authenticIdentity = oesInstallFilter.getRuntime().assertIdentity("USERID_TOKEN",user);

    HashMap responses = new HashMap();

    boolean isAccessAllowed = oesInstallFilter.getRuntime().isAccessAllowed(authenticIdentity,resource,action,dataBinder.getLocalData(),responses);

    System.out.println(isAccessAllowed+" "+responses);

    if (!isAccessAllowed) {
    System.out.println("Not authorized");
    int rc = super.prepareQueryText(dataBinder, executionContext);
    System.out.println("After PrepareQueryText "+dataBinder.getLocalData());
    return rc;
    }

    if (responses==null || responses.size()==0) {
    int rc = super.prepareQueryText(dataBinder, executionContext);
    System.out.println("After PrepareQueryText "+dataBinder.getLocalData());
    return rc;
    } else {
    System.out.println("There are "+responses.size()+" responses");
    }

    if (queryText==null) {
    queryText="";
    }

    if (queryText.trim().length() > 0) {

    queryText+=" <AND> ";

    }

    queryText+=" "+oesInstallFilter.getRoleAttribute()+" <contains> `";

    Iterator<String> keys = responses.keySet().iterator();

    while( keys.hasNext()) {

    queryText+=keys.next()+",";


    }

    queryText = queryText.substring(0,queryText.length()-1);
    queryText+="`";

    System.out.println("QueryText="+queryText);


    Properties props = dataBinder.getLocalData();
    props.setProperty("QueryText",queryText);


    int rc = super.prepareQueryText(dataBinder, executionContext);
    System.out.println("After PrepareQueryText "+dataBinder.getLocalData());
    return rc;
    }

    The idea is that we're looking for responses, and that response are values defined for a special meta-data attribute xoespolicies that I added to the repository. Any responses I recieve, I concatenate into the list of allowable values for that attribute and append it to the QueryText data binder attribute. This new QueryText is used by the search engine (in this case OracleText) to make the correct queries. This approach avoids having to go row by row when searching and applying policies on each individual document. This example can be extended to work with other attributes of the documents.


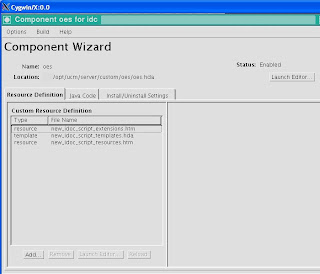
    The Resource Definition tab of the Component Wizard shows the resources for the custom IdocScript that I also created. I added a very simple function $isAccessAllowed$. It takes a single argument (the action), and retrieves the name from the UserData and the resource from the APP_ID attribute in the QUERY_STRING. The intricacies of creating custom IdocScript extensions could fill a whole new post, but I'll just focus on the relevant pieces here. From the oes.OESScriptExtensions, here's the code:

    case 4: //isAccessAllowed

    String appName = null;

    String queryString = binder.getEnvironment().getProperty("QUERY_STRING");

    List<String> parameters = Arrays.asList(queryString.split("&"));

    for (String param: parameters) {

    if (param.startsWith("APP_ID")) {

    int posOfEq = param.indexOf("=");
    appName = param.substring(posOfEq+1);

    }

    }


    Object authenticIdentity = oesInstallFilter.getRuntime().assertIdentity("USERID_TOKEN",userData.getProperty("dName"));
    System.out.println("OES USER="+authenticIdentity);
    System.out.println("APPNAME="+appName);

    String resource = oesInstallFilter.getResourcePrefix()+"/"+appName;
    String action = sArg1;

    bResult = oesInstallFilter.getRuntime().isAccessAllowed(authenticIdentity,resource,action, new Properties(), new HashMap());


    args[nargs] = ScriptExtensionUtils.computeReturnObject(1,
    bResult, iResult, dResult, oResult);


    return true;


    I think that there are lots of variations for the custom IdocScript that could call other OES API calls, or maybe once the call is made store information like the roles or privileges in other variables accessable from IdocScript. The sky is really the limit.

    Summary


    The samples that I've posted are just the foundation for many richer and deeper integrations between OES and UCM. I've done a lot of the heavy-lifting (classloader, configuration, basic integration) with the hope that other people will use it in their own projects. As always, I'm happy to answer questions, or take suggestions/request. Simply post them here.

    Friday, February 5, 2010

    Testing your WebLogic/Kerberos setup

    I spent several hours today beating my head against a wall and thought I'd post this in case anyone else runs into the same problem.

    I have a virtual environment with two machines, one is a KDC and one is just a WebLogic server. I setup WebLogic to do Kerberos, following the directions in the the documentation and could not figure out what I was doing wrong.

    Whenever I accessed WebLogic I kept seeing the header "Authorization: Negotiate TlRMTVNTUAAB..." with only a short string as the token. If you base64 decode that string you see that it starts with NTLMSSP. In other words most definitely NOT a Kerberos token.

    It looks like IE6 and IE 8 on Windows 2003 figures out that it's talking to the local machine (i.e. localhost) even if you use the fully qualified domain name!

    So if you're trying to get Kerberos working make sure you use a web browser on a different machine. Or just use Firefox instead.

    Thursday, February 4, 2010

    Extending the Universal Content Managament (UCM) Security Model with Oracle Entitlements Server (OES) - Part 1

    I've been working with a customer on setting up OES to provide authorization for WebLogic Portal (WLP) and Universal Content Management (UCM). The OES support for WLP is pretty straight-forward and can be found in the product documentation. The OES-UCM integration was a pretty trivial coding exercise, simply combining two existing product samples.

    Overview


    I've discussed before on the issues around data security and how to apply OES to that problem., but putting it into action, and seeing it work is very cool. Before I get into the details on the integration, I want to explain why you would need to add OES to your UCM solution. UCM has a very sophisticated security model optimized for content management, but there are at least two scenarios I can think of. The first is that you need a common model that goes beyond just UCM. UCM can externalize groups and accounts via LDAP, but some if you need a model richer than "groups", externalization via OES might make sense. The second is if you need very fine grained authorization based on rich context. The most common case is an Attribute Based Access Control (ABAC) model comparing information about users with attributes on the documents/folders in UCM.

    In either one of the two scenarios, the basic philosophy is to try to use as much of the OOTB UCM Security functionality as possible, and then use OES to externalize additional security capabilities. In practice, you're effectively ANDing the permissions from OES with the permissions in UCM, so making UCM should deliver higher performance and less work in OES.

    Setting up OES with UCM


    • Create an instance of the Java SM - I wanted to use the Java SM for performance reasons. This introduces some other issues, but in OES 10.1.4.3 cp3, there is a sample that demonstrates how to use a custom classloader with the Java SM. This can be very handy when integrating into Java containers because you can avoid/work around a lot of very nasty class loading conflicts.
    • Configure the UsernameIdentity Asserter in the SM - Chris called this thing the "worlds most dangerous identity asserter" and he's right, but from inside a Java container when all you have is the username, I think this will do.
    • Modify the intradoc.cfg to include the Java system properties and classpath for the instance - When the instance is created a file called BEA_HOME/ales32-ssm/java-ssm/instancename/bin/set-env.sh is created. This file contains a long list of Java system properties that need to be added to UCM environment. This is done in intradoc.cfg as follows:


      #Content Server Directory Variables
      IntradocDir=/VZ/opt/ucm/server/
      WebBrowserPath=/usr/bin/firefox

      #Additional Variables
      HTMLEditorPath=/usr/bin/gedit
      JAVA_CLASSPATH_defaultjdbc=$SHAREDDIR/classes/ojdbc14.jar
      FileEncoding=UTF8

      # Start Standard Java SM Properties
      JAVA_OPTIONS_1=-Dwles.scm.port=7063
      JAVA_OPTIONS_2=-Dwles.arme.port=7772
      JAVA_OPTIONS_3=-Dwles.config.signer=poc.us.oracle.com
      JAVA_OPTIONS_4=-Dlog4j.configuration=file:/opt/fmw/ales32-ssm/java-ssm/instance/ucm/config/log4j.properties
      JAVA_OPTIONS_5=-Dlog4j.ignoreTCL=true
      JAVA_OPTIONS_6=-Dwles.ssl.passwordFile=/opt/fmw/ales32-shared/keys/password.xml
      JAVA_OPTIONS_7=-Dwles.ssl.passwordKeyFile=/opt/fmw/ales32-shared/keys/password.key
      JAVA_OPTIONS_8=-Dwles.ssl.identityKeyStore=/opt/fmw/ales32-shared/keys/identity.jceks
      JAVA_OPTIONS_9=-Dwles.ssl.identityKeyAlias=wles-ssm
      JAVA_OPTIONS_10=-Dwles.ssl.identityKeyPasswordAlias=wles-ssm
      JAVA_OPTIONS_11=-Dwles.ssl.trustedCAKeyStore=/opt/fmw/ales32-shared/keys/trust.jks
      JAVA_OPTIONS_12=-Dwles.ssl.trustedPeerKeyStore=/opt/fmw/ales32-shared/keys/peer.jks
      JAVA_OPTIONS_13=-Djava.io.tmpdir=/opt/fmw/ales32-ssm/java-ssm/instance/ucm/work/jar_temp
      JAVA_OPTIONS_14=-Darme.configuration=/opt/fmw/ales32-ssm/java-ssm/instance/ucm/config/WLESarme.properties
      JAVA_OPTIONS_15=-Dales.blm.home=/opt/fmw/ales32-ssm/java-ssm/instance/ucm
      JAVA_OPTIONS_16=-Dwles.scm.useSSL=true
      # End standard Java properties

      # Add this so the Java SM can identify which config to use
      JAVA_OPTIONS_17=-Dwles.realm=ucm
      # The directory where the custom classloader looks for its classes
      JAVA_OPTIONS_18=-Dwles.providers.dir=/opt/fmw/ales32-ssm/java-ssm/lib/providers
      # Helpful debug flag for apache-commons-1.1.1
      JAVA_OPTIONS_19=-Dorg.apache.commons.logging.diagnostics.dest=STDOUT
      # An additional prefix for the UCM resources
      JAVA_OPTIONS_20=-Does.ucm.prefix=ucm/

      # Just log4j.jar and Apache Commons 1.1.1 go here. The rest are loaded using the custom class loader from OES
      CLASSPATH=/opt/fmw/ales32-ssm/java-ssm/lib/log4j.jar:/opt/fmw/ales32-ssm/java-ssm/lib/commons-logging-1.1.1.jar


      The classpath set-up is in two parts. The first is in the intradoc.cfg above. In order for OES to work inside of UCM, you'll need to move to apache commons logging-1.1.1. You can download the file from here. Add it to the BEA_HOME/ales32-ssm/java-ssm/lib directory. The second step is to configure the classes that the custom class loader is going to use. Copy the file BEA_HOME/ales32-ssm/java-ssm/examples/JavaAPIExample-with-customclassloader/JarFileList.txt to BEA_HOME/ales32-ssm/java-ssm/lib. From there modify the file as follows:

      /java-ssm/instance//config
      /java-ssm/lib/oesucmclassloader.jar
      /java-ssm/lib/api.jar
      /java-ssm/lib/css.jar
      /java-ssm/lib/saaj.jar
      /java-ssm/lib/framework.jar
      /java-ssm/lib/scmapi.jar
      #/java-ssm/lib/log4j.jar
      /java-ssm/lib/jmx.jar
      /java-ssm/lib/connector.jar
      /java-ssm/lib/asi_classes.jar
      /java-ssm/lib/EccpressoCore.jar
      /java-ssm/lib/EccpressoJcae.jar
      /java-ssm/lib/jsafeFIPS.jar
      /java-ssm/lib/jsafeJCEFIPS.jar
      /java-ssm/lib/sslplus.jar
      /java-ssm/lib/ssladapter.jar
      /java-ssm/lib/wlcipher.jar
      /java-ssm/lib/asitools.jar
      /java-ssm/lib/webservice.jar
      /java-ssm/lib/webserviceclient.jar
      /java-ssm/lib/org.mortbay.jetty.jar
      /java-ssm/lib/javax.servlet.jar
      /java-ssm/lib/sslserver.jar
      /java-ssm/lib/sslclient.jar
      /java-ssm/lib/pdsoap.jar
      /java-ssm/lib/antlr.jar
      /java-ssm/lib/axis.jar
      /java-ssm/lib/commons-discovery-0.2.jar
      #/java-ssm/lib/commons-logging-1.0.4.jar
      #/java-ssm/lib/commons-logging-1.1.1.jar
      /java-ssm/lib/wsdl4j-1.5.1.jar
      /java-ssm/lib/jaxrpc.jar
      /java-ssm/lib/providers/ales/xercesImpl.jar
      /java-ssm/lib/providers/ales/xml-apis.jar
      /java-ssm/lib/ld-client.jar
      /java-ssm/lib/ld-server-core.jar
      /java-ssm/lib

      Notice that I've commented out log4j.jar, and both on the commons-logging jars. Also, there is a jar file listed oesucmclassloader.jar that needs to be added to the file. You don't have this file yet, but in the next section you'll learn about how to build and finishing deploying the OES-UCM integration
    • One last thing, copy the exampleNames.xml to UCM_HOME/server/bin from ALES_SSM/java-ssm/examples/JavaAPIExample-with-customclassloader/config. This file is naming authority file used by the sample.

    Building and Deploying the OES UCM Integration


    The OES UCM integration is basically the combination of the Java custom-classloader example, and some of the basic UCM examples. The OES examples are shipped with the product and can be found under BEA_HOME/ales32-ssm/java-ssm/examples/JavaAPIExample-with-customclassloader. The UCM examples (HowToBundle) can be found here. I've worked the two examples together to perform some basic integration and uploaded to https://oes-ucm.samplecode.oracle.com/. I checked in the entire JDeveloper application. Its simple to build, but there are a few things that have to be done.

    • Update the oes-ucm library with the OES 10gR3cp3 and UCM 10gR3 libraries - The OES libraries are in BEA_HOME/ales32-ssm/java-ssm/lib (take all of them), and the ucm library is simply the UCM_HOME/server/shared/classes/server.zip


    • Update the deployment locations of the oescomponent and CustomClassLoader projects - The deployment target for the oescomponent project creates a deployable UCM component. The CustomClassLoader project generates a jar that gets loaded by the system classloader and works with the OES custom classloader (not the classloader itself - so bad jar name on my part ;). Modify the settings to deploy these jars to a valid locations


    • Deploy the oescomponent project - Deploy the ucm jar target. This will not only generate the oes-ucm.jar (the deployable UCM component), but it will also generate the oesucmclassloader.jar.
    • Copy the oesucmclassloader.jar to BEA_HOME/ales32-ssm/java-ssm/lib
    • Deploy the oes-ucm component to UCM - UCM_HOME/server/bin/ComponentTool -install location of oes-ucm.jar. This will create a component called oes
    • Start UCM - If everything works, you should have a Java SM running inside of UCM.

    Summary


    By combining the Java SM custom classloader example and some of the UCM custom examples, I've created a basic integration between OES and UCM. That integration is available on https://oes-ucm.samplecode.oracle.com. I'm looking forward to sharing more of the details of what the integration actual does in a Part 2 post, very shortly.

    Kerberos and WebLogic Server on Windows step-by-step

    The month of Kerberos continues

    I got a frantic call late last week asking for help getting WebLogic and Kerberos working. WebLogic would be deployed on Windows but, unlike in my previous post, this customer wanted IE to talk directly to WebLogic with no IIS server in between.

    Easy enough, right? It is, but there are some nuances.

    There are official docs available from download.oracle.com, but some people find them confusing. These are a bit simplified and are intended for this configuration only.

    In this environment the desktop and web server machines are both in the same Windows domain and thus also in the same Kerberos Domain. It's important to note that in my case the machine is part of the domain, but it doesn't actually have to be in the domain to get configuration working.

    Prerequisites:
    • You are using WebLogic with JDK 1.6 (either JRockit or the Sun JDK)
    • You have the Active Directory domain created
    • You have downloaded and installed WebLogic and may have created a domain
    • You are frustrated because the docs are confusing and despite working on this for hours you still can't get Kerberos authentication working
    Setup the Kerberos KDC bits...

    Before you do anything else we need to make sure that you're starting in a "good" state.

    Delete any keytab files you've already created. Delete any cached keys (del "%USERPROFILE%\krb5cc*"). Clear out any config files you've created. And log out and back into the account in which you're running Internet Explorer. Also make keep my previous post in mind while you're testing.

    If you have installed IIS on the machine uninstall it. IIS registers the kerberos service principal HTTP/machine and HTTP/machine.domain.com and if you leave IIS installed you'll never manage to get Kerberos on WebLogic working correctly.

    Install the setspn utility. Info on the utility is available on MS TechNet, and it is installed as part of the Windows Server 2003 Support Tools from the Windows product CD.

    Run the command "ldifde -f c:\export.txt" on your Windows server. This will export the entire contents of your Active Directory to a flat file so we can search it. What we need to do is make sure that no user or machine has already registered the Kerberos Service Principal we need for WebLogic. If you don't know what that means don't worry about it, just search the export.txt file for HTTP/machine (where machine is the name of the machine). If you find it in the file you'll need to use the setspn utility to remove the mapping. Here's what my export contained when things were broken:
    dn: CN=WEBSERVER,CN=Computers,DC=kerbtest,DC=com
    servicePrincipalName: HOST/WEBSERVER
    servicePrincipalName: HOST/webserver.kerbtest.com
    servicePrincipalName: HTTP/webserver
    servicePrincipalName: HTTP/webserver.kerbtest.com
    Use the setspn utility to remove the extraneous mappings. In my example above I had a mapping from the machine named "WEBSERVER" to the two principals HTTP/webserver and HTTP/webserver.kerbtest.com. I needed to remove those mappings before continuing on to the next step. You have to use the setspn utility with the -D flag to remove the mappings like so:
    C:\>setspn -d HTTP/webserver webserver
    Unregistering ServicePrincipalNames for CN=WEBSERVER,CN=Computers,DC=kerbtest,DC=com
    HTTP/webserver
    Updated object
    C:\>setspn -d HTTP/webserver.kerbtest.com webserver
    Unregistering ServicePrincipalNames for CN=WEBSERVER,CN=Computers,DC=kerbtest,DC=com
    HTTP/webserver.kerbtest.com
    Updated object
    Finally we need to create a new user in the domain so that WebLogic can get the Kerberos secret associated with the Kerberos SPN. The official docs and basically everything else you'll find on the Internet says to make the username the same as the machine name; I disagree strongly. If you give the machine and user the same name you'll just confuse yourself later trying to figure out which is which plus the setspn tool assumes you're talking about the machine and there's no way to tell it to operate on the user instead. So when you create the username make it generic, for example "wlsuser", "webuser" or "webserveruser".

    Once you've created that user use the setspn utility to associate the HTTP/machine and HTTP/machine.domain.com principals with the user you just created. Yes, you are going to associate the SPN with the user and NOT with the machine. I'll explain why later, but this is really important! When you do this you want HTTP to be in all caps and the machine name to be all lower case. The capitalization is important because the format has to match what Internet Explorer uses when it talks to the KDC. Here's what my output looks like:
    C:\>setspn -a HTTP/webserver webuser
    Registering ServicePrincipalNames for CN=web user,CN=Users,DC=kerbtest,DC=com
    HTTP/webserver
    Updated object
    C:\>setspn -a HTTP/webserver.kerbtest.com webuser
    Registering ServicePrincipalNames for CN=web user,CN=Users,DC=kerbtest,DC=com
    HTTP/webserver.kerbtest.com
    Updated object
    You can use ldifde to export the contents of AD again just to be sure you've got it right.

    Configure the WebLogic bits...

    Install WebLogic as normal.
    Create a new WebLogic domain using the Config Wizard.
    Make a backup of config/config.xml. Don't ask, just do it!
    Open the WebLogic console (http://localhost:7001/console by default)
    In the left Domain Structure navigation menu click on Security Realms, then click on myrealm.
    Click the Providers tab and you should see the list of Authentication Providers.
    Click the New button to create a new authentication provider and select Negotiate from the drop down.
    Go into the Identity Asserter's configuration and click on the Provider Specific tab. We don't want the NegotiateIdentityAsserter to run when you deploy an application with the authentication method set to Forms or Basic, so uncheck the "Form Based Negotiation Enabled" box.

    Note that once you hit save and restart WebLogic you'll probably be locked out of the console until we do the next bunch of steps. If you wind up in trouble just back out the above changes by swapping your backup of config.xml in, restarting WebLogic and your web browser.

    Copy a test app that requires Certificate authentication into your autodeploy directory. Then restart your server. If you don't have such app you'll have to create one.

    When you access the app you should get a 401 error page from WebLogic. If you do an HTTP trace you should see an HTTP transaction that looks something like this
    HTTP/1.1 401 Unauthorized
    Date: Thu, 04 Feb 2010 21:44:10 GMT
    Content-Length: 1518
    Content-Type: text/html
    WWW-Authenticate: Negotiate
    the key to look for is WWW-Authenticate: Negotiate. If you see that the Negotiate Identity Asserter is running and you can go ahead and finish up the Kerberos setup.

    Back to more Kerberos stuff...

    We need to create the kerberos ini and keytab files:

    Create a c:\windows\krb5.ini file that looks like the following. Update the domain and other information to reflect your environment:
    [libdefaults]
    default_realm = KERBTEST.COM
    ticket_lifetime = 600

    [realms]
    KERBTEST.COM = {
    kdc = 10.99.2.181
    admin_server = testmachine
    default_domain = KERBTEST.COM
    }

    [domain_realm]
    .kerbtest.com = KERBTEST.COM

    [appdefaults]
    autologin = true
    forward = true
    forwardable = true
    encrypt = true
    In the official docs and all over the Internet you will find similar files with lines that start with default_tkt_enctypes and default_tgs_enctypes. As long as you are using JDK 1.6 you should be able to leave them out. The "kdc" setting is the IP address of your KDC and the "admin_server" setting is the host name of your KDC.

    Run the command "c:\Oracle\Middleware\wlserver_10.3\common\bin\commEnv.cmd" to set your path and other environment variables so that you can run the Kerberos-related tools like ktab and kinit. Then cd into your domain's directory. In my case that's c:\Oracle\Middleware\user_projects\domains\base_domain.

    The Kerberos related classes included with the JDK require a config file to run properly. Basically this file tells the GSS layer which classes are used to do the actual work and provides configuration information to those classes. Again, don't worry about what any of this means, just do the same thing I do and you'll be fine. Use notepad to create a krb5login.conf file with these contents:
    com.sun.security.jgss.initiate {
    com.sun.security.auth.module.Krb5LoginModule required
    principal="webuser@KERBTEST.COM"
    useKeyTab=true
    keyTab=keytab
    storeKey=true
    debug=true;
    };

    com.sun.security.jgss.accept {
    com.sun.security.auth.module.Krb5LoginModule required
    principal="webuser@KERBTEST.COM"
    useKeyTab=true
    keyTab=keytab
    storeKey=true
    debug=true;
    };

    com.sun.security.jgss.krb5.accept {
    com.sun.security.auth.module.Krb5LoginModule required
    principal="webuser@KERBTEST.COM"
    useKeyTab=true
    keyTab=keytab
    storeKey=true
    debug=true;
    };
    We need to create the keytab file I specified in the krb5login.conf file above. To create the file you use the ktab tool, and to verify its contents you use the kinit command line tool. Both of these tools come with the JDK so you want to make sure that you're using the same JDK as WebLogic is going to use. The instructions you find in the docs talk about using the ktab and kinit command line utilities directly, and if you want you can use them. I on the other hand like lots and lots of debugging information, so I prefer to invoke the same classes by running java.exe and passing a few extra command line options. Do whichever you feel more comfortable with and as long as kinit works everything is fine.

    First create the keytab with kinit:
    C:\Oracle\Middleware\user_projects\domains\base_domain>java.exe -Dsun.security.krb5.debug=true sun.security.krb5.internal.tools.Ktab -k keytab -a webuser@KERBTEST.COM
    Password for webuser@KERBTEST.COM:abcd1234
    Config name: C:\WINDOWS\krb5.ini
    Using builtin default etypes for default_tkt_enctypes
    default etypes for default_tkt_enctypes: 3 1 23 16 17.
    >>> KeyTabEntry: key tab entry size is 46
    >>> KeyTabEntry: key tab entry size is 46
    >>> KeyTabEntry: key tab entry size is 54
    >>> KeyTabEntry: key tab entry size is 62
    >>> KeyTabEntry: key tab entry size is 54
    Done!
    Service key for webuser@KERBTEST.COM is saved in keytab
    If you don't see ktab create a keytab file, or if the file winds up being just a few bytes then don't proceed any further since it won't work; instead go back and check the first bunch of steps - exporting the AD contents, checking the user you created, etc.

    Next run kinit to insure that the keytab file is OK and that your configuration files are all setup correctly.
    C:\Oracle\Middleware\user_projects\domains\base_domain>java.exe -Dsun.security.krb5.debug=true sun.security.krb5.internal.tools.Kinit -k -t keytab webuser@KERBTEST.COM
    >>>KinitOptions cache name is C:\Documents and Settings\administrator.KERBTEST\krb5cc_administrator
    Principal is webuser@KERBTEST.COM
    >>> Kinit using keytab
    >>> Kinit keytab file name: keytab
    >>> KeyTabInputStream, readName(): KERBTEST.COM
    >>> KeyTabInputStream, readName(): webuser
    >>> KeyTab: load() entry length: 46; type: 3
    >>> KeyTabInputStream, readName(): KERBTEST.COM
    >>> KeyTabInputStream, readName(): webuser
    >>> KeyTab: load() entry length: 46; type: 1
    >>> KeyTabInputStream, readName(): KERBTEST.COM
    >>> KeyTabInputStream, readName(): webuser
    >>> KeyTab: load() entry length: 54; type: 23
    >>> KeyTabInputStream, readName(): KERBTEST.COM
    >>> KeyTabInputStream, readName(): webuser
    >>> KeyTab: load() entry length: 62; type: 16
    >>> KeyTabInputStream, readName(): KERBTEST.COM
    >>> KeyTabInputStream, readName(): webuser
    >>> KeyTab: load() entry length: 54; type: 17
    Added key: 17version: 1
    Added key: 16version: 1
    Added key: 23version: 1
    Added key: 1version: 1
    Added key: 3version: 1
    Ordering keys wrt default_tkt_enctypes list
    Config name: C:\WINDOWS\krb5.ini
    Using builtin default etypes for default_tkt_enctypes
    default etypes for default_tkt_enctypes: 3 1 23 16 17.
    >>> Kinit realm name is KERBTEST.COM
    >>> Creating KrbAsReq
    >>> KrbKdcReq local addresses for webserver are:

    webserver/10.99.2.133
    IPv4 address
    Using builtin default etypes for default_tkt_enctypes
    default etypes for default_tkt_enctypes: 3 1 23 16 17.
    >>> KrbAsReq calling createMessage
    >>> KrbAsReq in createMessage
    >>> Kinit: sending as_req to realm KERBTEST.COM
    >>> KrbKdcReq send: kdc=10.99.2.181 UDP:88, timeout=30000, number of retries =3,
    #bytes=169
    >>> KDCCommunication: kdc=10.99.2.181 UDP:88, timeout=30000,Attempt =1, #bytes=1
    69
    >>> KrbKdcReq send: #bytes read=210
    >>> KrbKdcReq send: #bytes read=210
    >>> reading response from kdc
    >>> KDCRep: init() encoding tag is 126 req type is 11
    >>>KRBError:
    sTime is Sun Feb 07 14:40:09 EST 2010 1265571609000
    suSec is 135477
    error code is 25
    error Message is Additional pre-authentication required
    realm is KERBTEST.COM
    sname is krbtgt/KERBTEST.COM
    eData provided.
    msgType is 30
    >>>Pre-Authentication Data:
    PA-DATA type = 11
    PA-ETYPE-INFO etype = 23
    >>>Pre-Authentication Data:
    PA-DATA type = 2
    PA-ENC-TIMESTAMP
    >>>Pre-Authentication Data:
    PA-DATA type = 15
    Kinit: PREAUTH FAILED/REQ, re-send AS-REQ
    >>>KrbAsReq salt is KERBTEST.COMwebuser
    Pre-Authenticaton: find key for etype = 23
    AS-REQ: Add PA_ENC_TIMESTAMP now
    >>> EType: sun.security.krb5.internal.crypto.ArcFourHmacEType
    >>> KrbAsReq calling createMessage
    >>> KrbAsReq in createMessage
    >>> Kinit: sending as_req to realm KERBTEST.COM
    >>> KrbKdcReq send: kdc=10.99.2.181 UDP:88, timeout=30000, number of retries =3,
    #bytes=240
    >>> KDCCommunication: kdc=10.99.2.181 UDP:88, timeout=30000,Attempt =1, #bytes=2
    40
    >>> KrbKdcReq send: #bytes read=1243
    >>> KrbKdcReq send: #bytes read=1243
    >>> reading response from kdc
    >>> EType: sun.security.krb5.internal.crypto.ArcFourHmacEType
    >>> KrbAsRep cons in KrbAsReq.getReply webuser
    New ticket is stored in cache file C:\Documents and Settings\administrator.KERBTEST\krb5cc_administrator
    Notice that line "New ticket is stored". If you get that line it means that the Kerberos configuration is correct and that the Java code was able to acquire the secret key.

    Last configuration step...

    Edit the bin\startWebLogic.cmd to add the line set JAVA_OPTIONS below in the place I've shown it:
    echo starting weblogic with Java version:

    %JAVA_HOME%\bin\java %JAVA_VM% -version

    set JAVA_OPTIONS=%JAVA_OPTIONS% -Dsun.security.krb5.debug=true -Djavax.security.auth.useSubjectCredsOnly=false -Djava.security.auth.login.config=krb5Login.conf -Djava.security.krb5.realm=KERBTEST.COM -Djava.security.krb5.kdc=testmachine.kerbtest.com
    Restart WebLogic, access the site with IE and revel in your success.

    Problems? Issues?

    Hit me up in the comments!